
Shipping containers are everywhere. You find them parked in backyards, converted into workshops, used as job site storage, and repurposed into everything from offices to hunting camps. Their appeal makes sense — they're tough, affordable, and built to survive rough handling at sea. But anyone who has owned one for more than a few months has probably opened the door on a hot afternoon and been hit by a wall of superheated air, a smell of rust and mildew, or discovered that tools stored inside are showing moisture damage they can't quite account for.
The container itself isn't the problem. What happens inside an unventilated steel box in the sun is.
Why Steel Containers Trap Heat and Moisture
A shipping container is, by design, nearly airtight. That quality made it ideal for ocean freight — cargo stayed dry, pests stayed out, and the contents were secure. But that same characteristic becomes a liability the moment the container transitions from a moving cargo hold to a stationary storage or work space.
Steel is an efficient conductor. When the sun beats down on a container's roof — which is often a dark color and completely exposed — that heat moves rapidly into the interior. On a 90°F day, the inside of an unventilated container can reach 130°F to 150°F or higher. That kind of heat is hard on everything: it degrades plastics, warps wood floors, damages electronics, accelerates corrosion, and makes the space genuinely dangerous to work in for any length of time.
Moisture is the slower, less obvious threat. Steel expands and contracts with temperature swings, and that thermal cycling generates condensation on interior surfaces — even in climates that feel dry. Cardboard boxes absorb moisture and collapse. Tools develop surface rust. Anything with organic material — wood pallets, fabric tarps, stored lumber — becomes a candidate for mold. The container seals the moisture in just as effectively as it once sealed cargo out. The same dynamic that drives mold problems in enclosed spaces like attics applies here, just in a tighter and more sealed environment. Left unaddressed, that moisture also silently degrades any insulation you've added to the container — reducing its effectiveness even when it looks intact.
When humidity levels build high enough, the result is a phenomenon known as container rain. It occurs when warm, humid interior air contacts the steel ceiling and walls — which cool or heat faster than the air mass inside — and the moisture reaches its dew point and condenses on those metal surfaces. Enough accumulates that it literally drips from the ceiling like rain, soaking stored goods, accelerating rust, and saturating anything beneath it. While container rain is most common at night when exterior temperatures drop sharply, the right combination of temperature differential and humidity can trigger it at any hour of the day. Continuous ventilation is the direct countermeasure: keeping fresh air moving through the container prevents humidity from reaching the concentration where condensation forms and narrows the thermal gap between the interior air and the steel surfaces.
Both problems share the same solution: moving air. Ventilation pulls heat out of the interior and continuously replaces stale, humid air with fresh outside air before condensation gets a chance to form. But how the ventilation is set up matters — because not all container vents are designed with the same attention to how they're attached to the roof.
What Cutting Into a Container Roof Actually Does

A container's corrugated steel roof isn't just a weather barrier — it's a structural element. Those ribs carry load. When you cut a hole in the roof to install a vent, you've interrupted the structural continuity of that section of steel, and the vent that goes over that hole needs to restore what was removed.
A lot of aftermarket container vents don't address this at all. They're designed to sit over the hole and be secured with sealant or caulking. Caulking is an important part of a watertight installation, but it is not a structural connection. Sealant bonds surfaces together; it does not restore the load-carrying capacity of the steel that was cut away. A vent held in place only by caulking can shift, separate, or fail — especially on a container that gets moved or repositioned.
The Conex Solar RoofBlaster addresses this with a different installation philosophy. The base flashing is form-fitted to the container's ribbed profile so it sits flush rather than bridging unevenly across the corrugations. A compressible gasket creates the weathertight seal at the interface. Then a significant number of screws — not sealant — mechanically fasten the vent to the roof. The screws do the structural work. The gasket and caulking provide the watertight seal. Together, the installed vent becomes part of the container's structure rather than something sitting on top of it.
The flashing is also designed to span only one roof rib rather than two, keeping the structural interruption as small as possible and concentrating the fastening at a single rib rather than requiring the flashing to bridge a wider span.
Before you order, you'll need to know your container's rib measurement. The 3.5" and 6.5" sizing options refer to the width of the rib's top flat section — the horizontal surface the flashing seats against — not the overall height of the rib. Getting this measurement right is what allows the flashing to sit flush and the gasket to seal properly. Solar Blaster has a short video walkthrough on how to measure your container ribs correctly before purchasing.
If you're evaluating other container vents and the installation method amounts to "cut a hole, apply sealant, press vent in place" — that's worth paying close attention to. Sealant alone cannot restore what was removed when you made that cut.
When a Roof Vent Isn't the Right Fit
Roof-mounted vents are the right choice for most container installations. But there are situations where the roof isn't accessible or available — containers stored under structures, certain configurations, or setups where the owner simply prefers not to cut into the roof.
For those cases, Solar Blaster offers the Conex Solar Mega SideBlaster Adjustable, which mounts on the container's side wall rather than the roof. It uses the same 5W solar panel and 96 CFM fan as the Mega RoofBlaster, so the ventilation performance is equivalent. The "Adjustable" designation refers to the solar panel bracket, which pivots to let you angle the panel toward the sun's path — useful when the container's orientation doesn't put the panel in optimal sun, or when a side wall simply faces a better solar angle than the roof does. The SideBlaster installs using the same gasket-and-screw method as the roof vents, with a form-fitting flashing designed specifically for container side panels.
How Many Vents Does a Container Need?
The general guideline for container ventilation is one vent for every 8 to 10 feet of container length. For a standard 20' container, that puts you in the range of 1 to 2 vents. For a 40' container, 3 vents is strongly recommended — one near each end and one in the middle — to ensure that airflow reaches the full interior length rather than just cycling near the exhaust points.
Even distribution across the length matters as much as the total count. A single vent positioned in the center of a 40' container will move air in the middle while leaving both ends stagnant. Heat and moisture accumulate wherever airflow doesn't reach. Think of it less like a single exhaust fan and more like a coverage problem: you want airflow to sweep the entire interior.
Understanding Air Refresh Rates
The effectiveness of a ventilation system is measured in cubic feet per minute (CFM) — how much air volume it moves per minute. Higher CFM means more frequent complete air changes, which translates directly to a cooler, drier interior.
Solar Blaster's Conex container roof vents come in two configurations. The standard Conex Solar RoofBlaster uses a 4.5W solar panel driving an 80mm fan rated at 35.2 CFM. The Conex Solar Mega RoofBlaster steps up to a 5W panel and a 120mm fan rated at 96 CFM — nearly three times the airflow per unit.
The table below shows approximate air refresh times based on container size and vent configuration. A standard 20' container has approximately 1,170 cubic feet of interior volume; a standard 40' container has approximately 2,350 cubic feet. All figures assume proper intake ventilation is in place.
| Container | Vents | Vent Model | Total CFM | Approx. Air Refresh |
|---|---|---|---|---|
| 20' | 1 | 4.5W Standard (35.2 CFM) | 35.2 | ~33 min |
| 20' | 1 | 5W Mega (96 CFM) | 96 | ~12 min |
| 20' | 2 | 4.5W Standard (35.2 CFM) | 70.4 | ~17 min |
| 20' | 2 | 5W Mega (96 CFM) | 192 | ~6 min |
| 40' | 2 | 4.5W Standard (35.2 CFM) | 70.4 | ~33 min |
| 40' | 2 | 5W Mega (96 CFM) | 192 | ~12 min |
| 40' | 3 | 4.5W Standard (35.2 CFM) | 105.6 | ~22 min |
| 40' | 3 | 5W Mega (96 CFM) | 288 | ~8 min |
Refresh rates are theoretical calculations based on complete interior volume exchange with adequate intake ventilation. Real-world performance varies based on intake placement, temperature differential, and ambient conditions.
The numbers make a strong case for adding a third vent on a 40' container. Two standard vents refresh the air roughly every 33 minutes — the same rate as a single standard vent in a 20' container. A third vent cuts that to about 22 minutes, a meaningful improvement in how quickly heat and moisture are cleared after the door has been sealed. Both models include a 25-year-rated solar panel and a fan rated for 50,000 hours — approximately 15 years at 9 hours per day. When the sun isn't out, both continue operating as passive vents, allowing hot air to rise and escape without fan assistance.
Intake Vents: The Half of the System That Gets Skipped
Exhaust vents move air out. Intake vents bring fresh air in. Both are required — and without intake vents, exhaust vents work considerably harder for considerably less result. A sealed container with only exhaust points creates a negative pressure condition that restricts airflow and reduces the effective CFM the fans can achieve.
Balanced ventilation — matching intake area to exhaust capacity — is a principle recognized in building codes for good reason: airflow requires a complete path, not just an exit. For each Solar Blaster RoofBlaster exhaust vent, four 2.5" intake vents provides the correctly balanced intake area. This ratio ensures the exhaust fans can operate at full efficiency rather than fighting against pressure resistance from an undersupplied system.
Intake vents are installed on the shady side of the container, approximately 10 inches above ground level. That height keeps them above typical rain splash-back while still bringing air in near floor level, where it's coolest. They're spaced evenly along the full length of the wall.
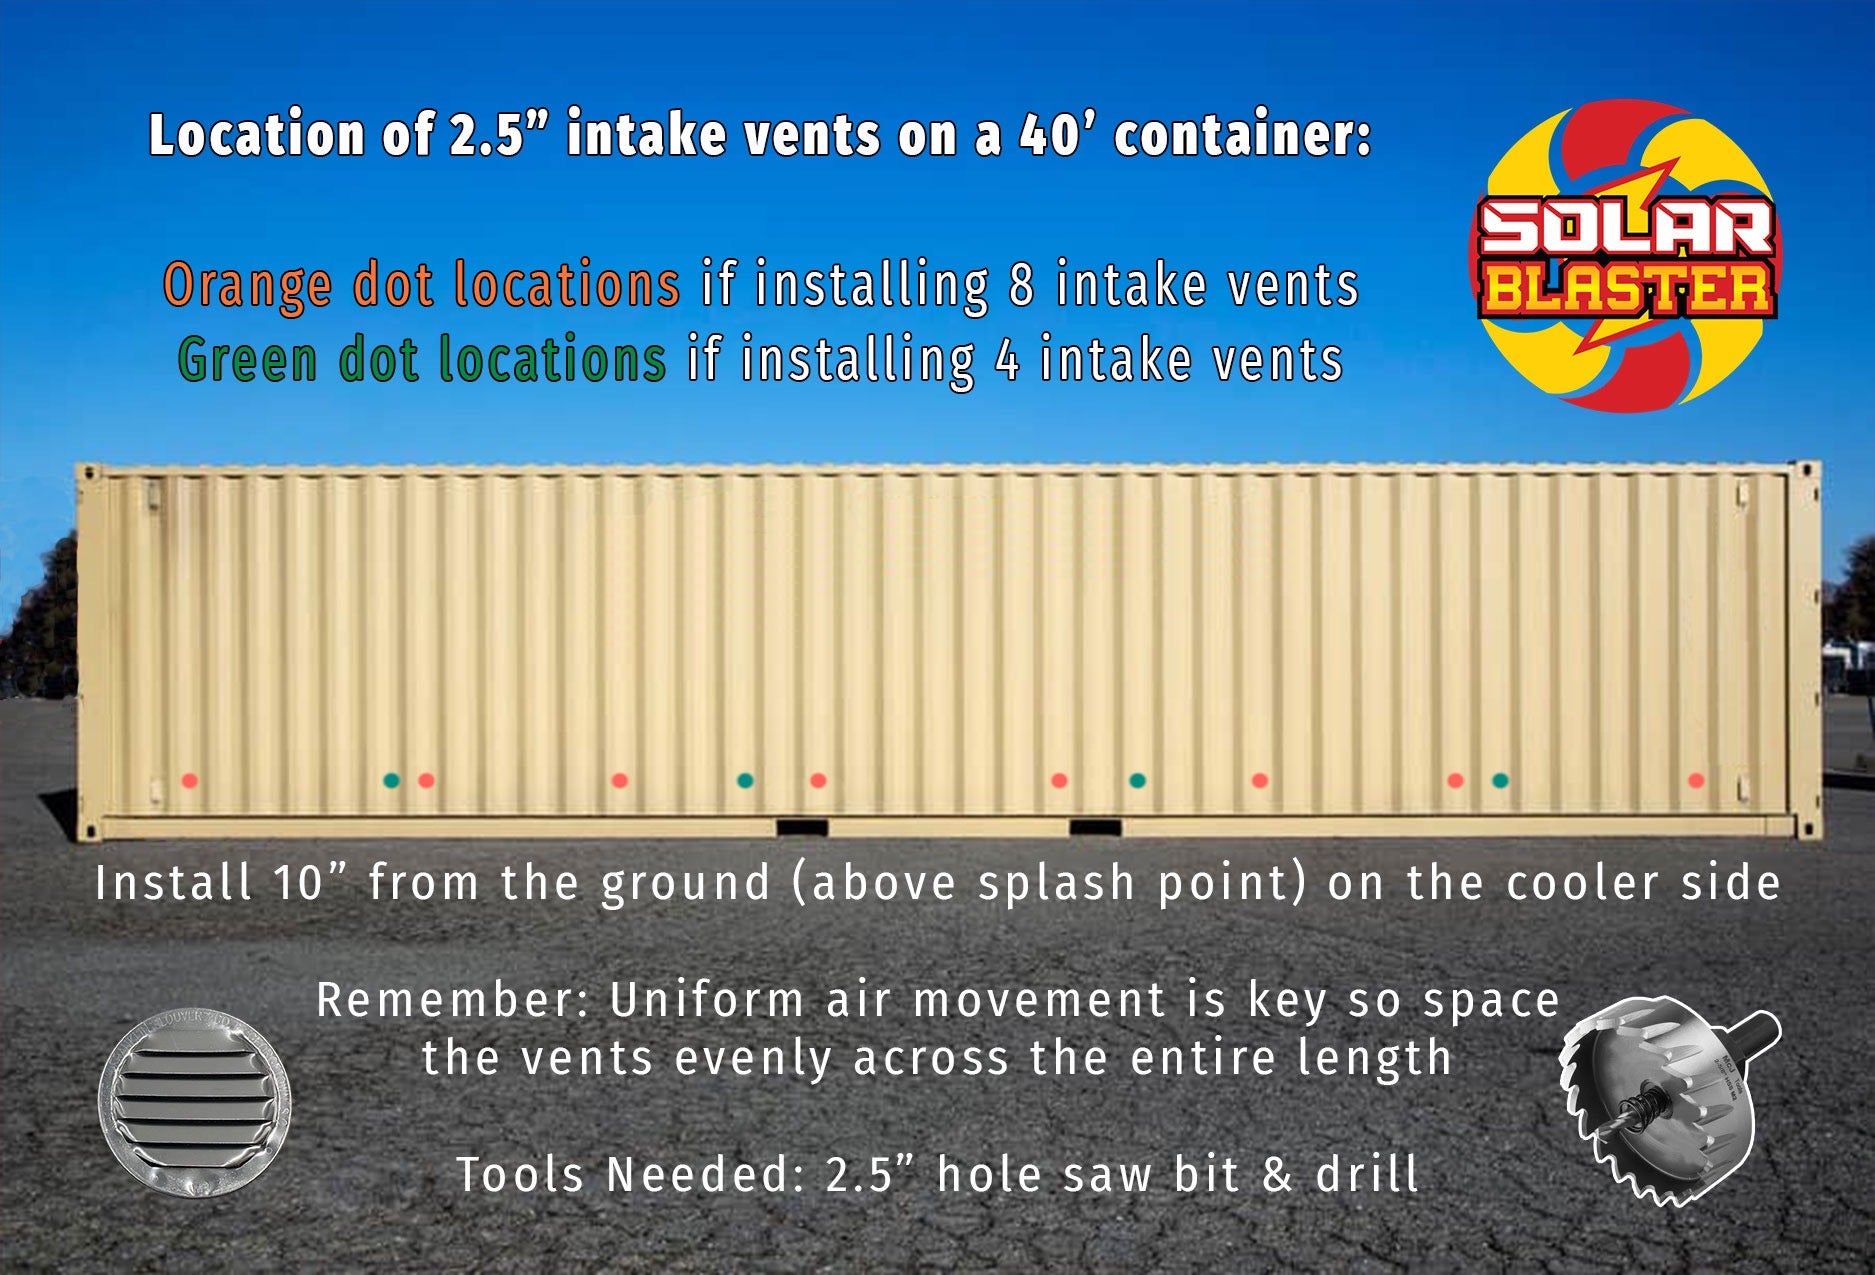
The placement logic is straightforward. Cool outside air is denser and naturally low; when it enters low on the shaded side, it flows across the floor and rises as it warms, naturally pushing hot, moisture-laden air upward toward the exhaust vents at the roof. This thermal stack effect works with the solar fans rather than against them, amplifying their output without requiring any additional energy.
For a 40' container with three roof vents, that's twelve intake vents — four per exhaust vent — distributed across the lower section of the shaded side wall. Each requires only a 2.5" hole saw cut, making installation straightforward. The improvement to overall system efficiency is significant: properly balanced intake is what allows the exhaust vents to achieve the air refresh rates shown in the table above.
Adding Natural Light with a Solar Tube
Heat and moisture are the functional problems. Darkness is the usability problem. Even with doors open, useful daylight in a shipping container fades quickly past the first several feet. A work light on an extension cord is the standard workaround — it's one more thing to remember, one more thing to trip over, and it does nothing when power isn't available.
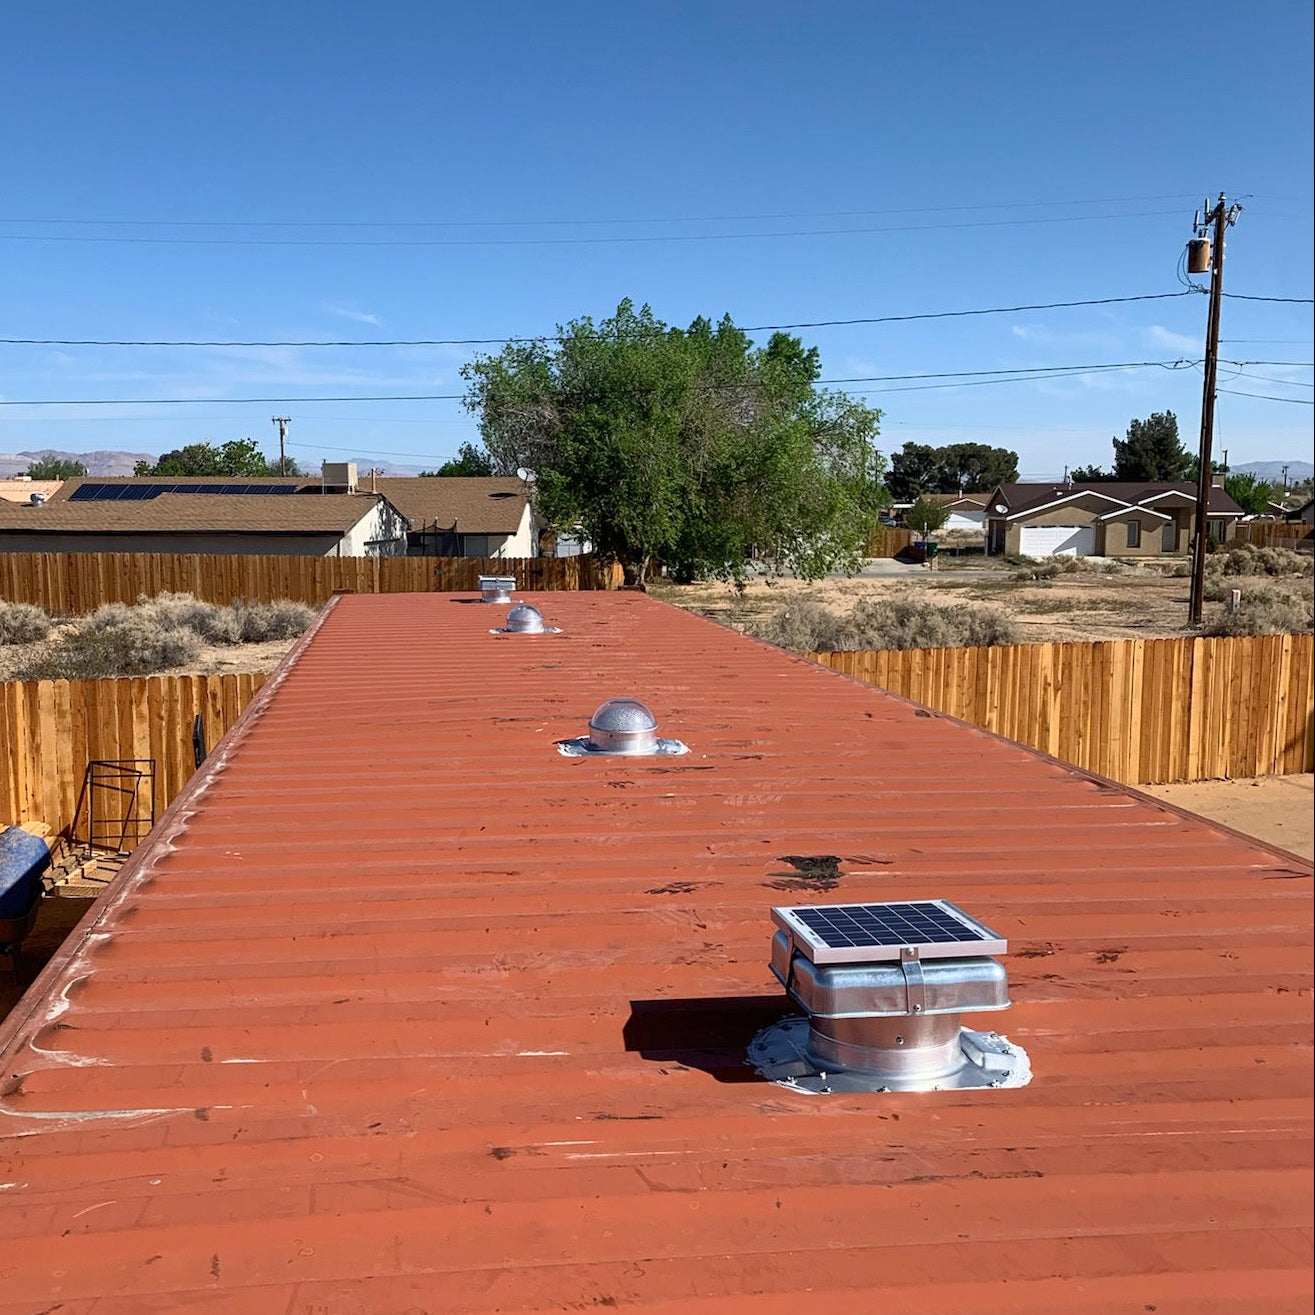
A solar tube — also called a tubular skylight — solves this without any electrical connection at all. The Conex Solar LightBlaster is a solar tube designed specifically for shipping containers, sized and shaped to fit the ribbed roof profile. It captures sunlight at the roof through a high-impact acrylic dome, channels it down through a highly reflective tube, and disperses it into the container interior through a ceiling diffuser. During daylight hours, it simply works — no switch, no wiring, no operating cost.
The LightBlaster installs with the same form-fitting flashing, gasket, and mechanical screw-fastening method as the RoofBlasters, restoring roof integrity the same way. It integrates naturally into a ventilation plan rather than competing for roof space.
For a 40' container with three RoofBlasters — one near each end, one in the middle — two LightBlasters placed in the gaps between the vent positions gives you even ventilation coverage end to end and natural light reaching the full interior length. The space goes from a hot, dark storage box to something genuinely usable as a workshop, studio, or equipment room — with no utility costs for either the ventilation or the lighting during daylight hours.
Getting the Setup Right
What makes container ventilation effective is less about the individual components and more about how they're deployed together. The right number of vents, distributed evenly across the roof. Intake vents placed about 10 inches above the ground on the shaded side wall, spaced across the full container length. A mounting method that mechanically restores what the roof cutout removed rather than just covering it. And before any of that — knowing your container's rib measurement so the flashing fits the way it's designed to.
The problems that come with an unventilated container — heat damage, tool rust, mold, condensation, container rain — aren't built into the steel. They're a function of stagnant air, and stagnant air is something a well-designed ventilation system can fix. Get the setup right and a shipping container stops being a liability and becomes a genuinely functional space.
Ready to ventilate your shipping container?
Solar Blaster's Conex RoofBlasters and SideBlasters are engineered specifically for shipping containers — with form-fitted flashing, a compressible gasket, and mechanical screw fastening that restores your roof's structural integrity. Available in two sizes to fit 3.5" and 6.5" rib profiles.
Shop Container VentsBring natural light into your container — no wiring required.
The Conex Solar LightBlaster is a solar tube designed specifically for shipping containers. Same structural installation method as the RoofBlasters — fits right into your ventilation layout and fills your container with daylight from sunrise to sunset.
Shop LightBlasters